
With one simple trick, everything stays exactly where it should.
Plenty of DIYers have run into this: you’re replacing old wall cladding, you get the first tiles up, step back and feel pleased with how straight it all looks - and then the row slowly starts creeping down towards the worktop or floor. Patience disappears, and the enjoyment of the job goes with it. In most cases, the cause is a familiar combination: the adhesive is mixed to the wrong consistency, there’s no proper support, and the laying technique isn’t quite right. Learn a few trade tricks and you can lock wall tiles in place almost instantly, avoiding constant pushing, re-levelling and re-aligning.
Why wall tiles suddenly start slipping
Tile adhesive applied too thinly or too thickly
The most common reason for tiles sliding is, quite literally, in the bucket: the adhesive. Many people add extra water to powdered adhesive so it spreads more easily. It sounds sensible, but it backfires straight away. If the mix is too runny, it loses grip immediately - the tile effectively “floats” on the bed and won’t hold.
The opposite can be just as troublesome: if you apply an overly thick layer, the tile’s own weight gradually pushes it down. The adhesive then behaves like a lubricating film, while gravity keeps working non-stop.
“A good adhesive mix is more like a firm, mouldable paste that stays on the notched trowel and doesn’t slump or run by itself.”
Stick precisely to the manufacturer’s specified water ratio and you avoid most of the hassle. The adhesive should spread well, but still keep its shape. If it drips off the trowel, it’s too thin - add more powder and mix again.
The wrong adhesive and no system behind it
A second common mistake is grabbing any wall adhesive off the shelf without checking the classification. For wall tiles - especially in bathrooms or kitchens - a C2 mortar adhesive is worth choosing. The C2 marking is clearly printed on the bag. It offers stronger bonding and is designed for situations where tiles must hold on a vertical surface.
Also crucial is the “open time”: how long the adhesive remains workable after you apply it. The packaging should state at least 20 minutes. Only then can you still adjust tiles without sacrificing bond strength.
Levelling systems using dedicated clips and wedges, or self-clamping tile spacers, are also extremely useful. They keep joint widths consistent and help stabilise the surface, reducing the chance of tiles creeping downwards on their own.
- Choose a C2 mortar adhesive with increased bond strength
- Check for an open time of at least 20 minutes
- Use levelling clips or sturdy cross spacers for the joints
- Never “top up with water” directly in the bucket - mix a fresh batch instead
The wooden batten trick: how to stop slipping mechanically
Don’t start at the bottom: why the second row is the best starting point
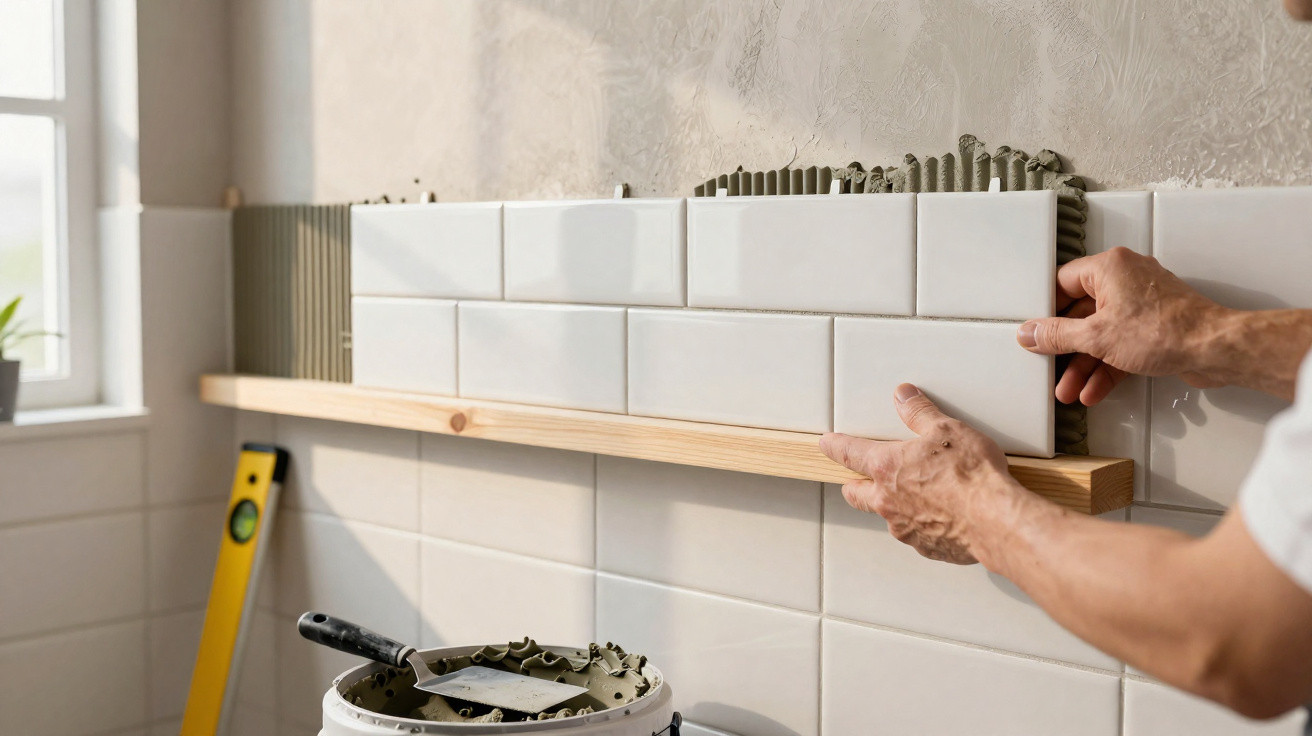
The most effective way to prevent tiles sliding is surprisingly simple - and straight from professional practice: don’t begin with the very bottom row. Start with the second row instead.
The reason is straightforward: floors, shower trays and worktops are rarely perfectly level. If you build upwards from them, every uneven spot gets transferred into each tile row above. At the same time, the bottom row often lacks reliable support while the adhesive is still soft.
The solution is to fix a continuous, perfectly level wooden batten to the wall. This batten acts as a temporary ledge and takes the weight of the first rows of tiles.
“The wooden batten works like an invisible shelf for your wall tiles - it takes the load off the adhesive and keeps everything in line.”
How to fit the batten correctly
- Use a spirit level to mark a line where the second row of tiles will later run.
- Hold a straight timber batten (at least as long as the tiled area) along this line.
- Screw the batten firmly in place with suitable plugs and screws - it must not bow.
- Keep checking with the spirit level to confirm everything remains perfectly level.
Only then should you start tiling: the first visible row sits neatly on the batten, cannot slip downwards, and becomes an accurate reference for every row above. The whole installation stays secure while the adhesive is still curing.
Professional technique: double adhesive application with a notched trowel
Why double buttering holds far better
With larger tile formats in particular, coating only the wall is rarely enough. Professionals use double buttering: adhesive goes on both the wall and the back of the tile. This creates full contact and removes voids where moisture could later collect.
A 6 mm notched trowel is well suited here. First, spread the adhesive evenly over the wall and comb it in one direction. Then coat the back of the tile and comb the ridges across the direction used on the wall.
“When the adhesive ridges on the wall and tile cross, pressing the tile in creates a strong suction effect - the tile practically pulls itself tight.”
Key points:
- Press tiles firmly and slide them slightly back and forth until you no longer hear any crunching.
- Regularly lift a tile to check whether the back is fully covered in adhesive.
- Work row by row rather than spreading adhesive over a large area - that way nothing skins over unused.
Patience pays: waiting time before the bottom row
Why the last row would be the first to suffer
Once you’ve completed a few rows above the wooden batten, it’s tempting to continue straight down to the floor. This is exactly where many problems begin. Until the adhesive has fully hardened, the batten must stay in place. Remove it too early and the tiles resting on it can settle slightly or shift.
A sensible guideline is at least 24 hours of curing time. This aligns with standard expectations for tile adhesives and helps ensure the adhesive reaches its final strength. Only then should you pick up the drill and bit again to remove the batten.
After that, you’ll typically have an uneven strip left at the bottom. Now you can measure, cut and fit the lowest row so it follows the floor, shower tray or worktop precisely. Small inconsistencies in the substrate are corrected with tailored cuts - not with a crooked tile line.
Your plan for a slip-free tiled wall
| Step | Action |
|---|---|
| 1 | Choose a suitable C2 tile adhesive and mix строго to the stated ratio |
| 2 | Fix a wooden batten perfectly level at the height of the second row |
| 3 | Use double buttering with a 6 mm notched trowel, crossing the ridges |
| 4 | Insert spacers or levelling clips to keep joints even |
| 5 | Allow at least 24 hours to cure, then remove the wooden batten |
| 6 | Cut and fit the bottom row precisely |
Practical tips many DIYers underestimate
Substrate, tools, and common sources of mistakes
Before you apply even a gram of adhesive, take a hard look at the surface. Flaking old paint, dust, or greasy films drastically reduce bonding. A clean, dry, sound plaster surface - and, where needed, a suitable primer - is the foundation for everything that follows.
Tool cleanliness matters just as much. A blunt or bent notched trowel spreads adhesive unevenly. Blocked levelling clips or wedges clogged with adhesive prevent accurate alignment. A quick clean during the job can save expensive rework later.
Common, easily avoided mistakes:
- Spreading adhesive over too large an area - it skins over before tiles are placed.
- Letting joint widths vary randomly - the eye notices every inconsistency.
- Not checking with a spirit level or laser level - small errors quickly add up.
When it’s worth calling in a professional
If you’re planning a full walk-in (level access) shower, large-format porcelain slabs, or complicated niches, it’s easy to hit the limits of DIY. Larger formats are less forgiving of adhesive errors, and in wet areas the wrong build-up can lead to moisture problems and mould later.
For “standard” kitchen splashbacks or half-height bathroom tiling, the combination of a wooden batten, the right adhesive, double buttering and a levelling system is usually more than enough. If you follow the basics carefully, you can achieve a finish that doesn’t need to hide from a professional - without the drama of slipping tiles.

Comments
No comments yet. Be the first to comment!
Leave a Comment