
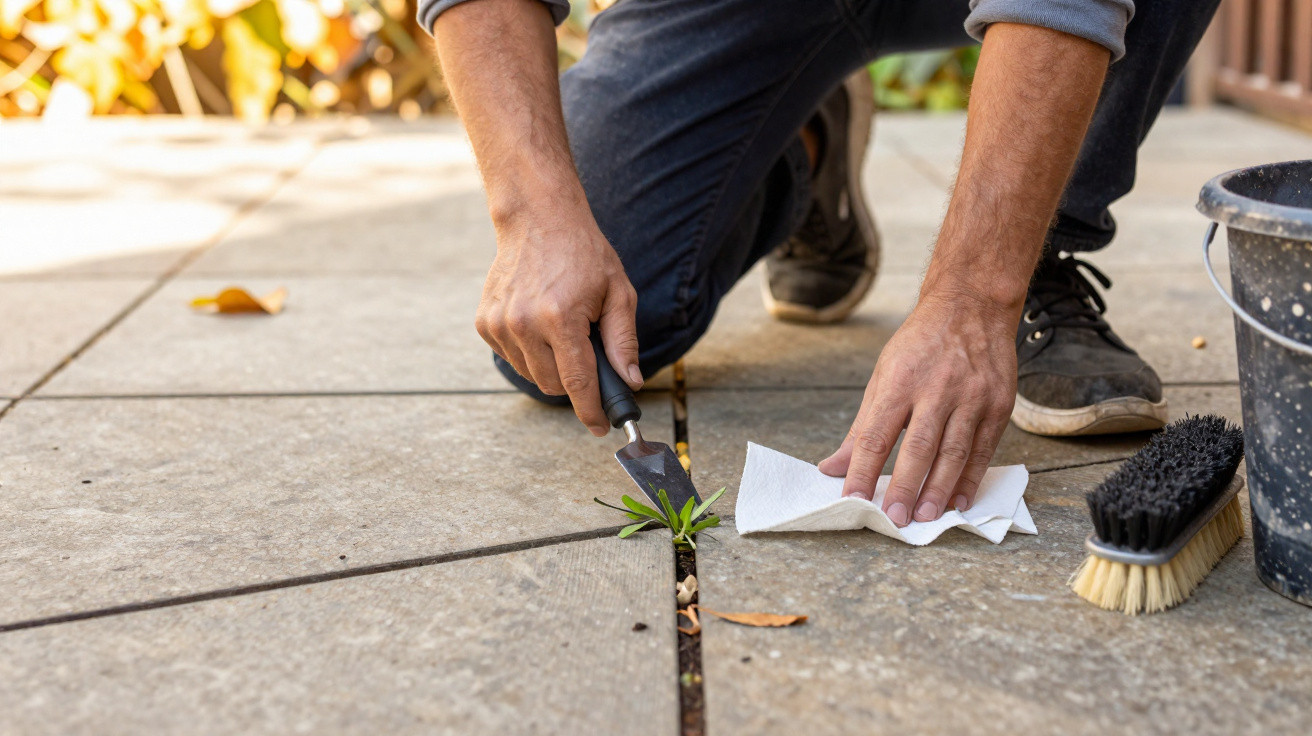
Between paving setts and patio slabs, fresh growth appears year after year. Homeowners scrub, scrape, spray vinegar or pour on boiling water – yet the surface never stays clean for long. In many cases, the real issue is less about which remedy you choose and more about what the calendar says and how you deal with the roots.
Why timing matters more than the product when weeding paving joints
If you tackle the joints in March or early April, you are usually working against nature – and making life harder for yourself. Many of the wild plants that establish between slabs form deep taproots. Dandelions and thistles can extend a good 15 centimetres into the ground. If you only pull off what you can see, most of the plant remains hidden beneath the stone.
That is exactly what triggers strong regrowth. The plant responds as if it has been cut back hard: it shoots again even more vigorously, often producing several new rosettes. If you then scrape again every few weeks, you encourage the very thing you are trying to avoid – a permanent subscription to joint-weeding.
"If you weed too early and only take the top off, you strengthen the root instead of weakening it."
For years, horticultural professionals have therefore stressed one point: you need to get the root out as completely as possible. And even with the right tool, that only works properly when the soil and weather cooperate.
Spring: why it’s best not to start before mid-May
March and April are often dominated by showers, changeable temperatures and damp ground. Many people, out of frustration, reach for "gentler" options such as vinegar, liquid manure or hot water. However, these only act on the surface – and only in dry conditions. A downpour within two days can wash everything away before the leaves are even properly damaged.
To get effective results in spring, several conditions need to line up at once:
- a settled dry spell lasting at least 72 hours
- no rain in the two days after treatment
- joints and leaves that have dried off
- temperatures where sunshine boosts the effect
A rule of thumb is that only after the so-called Ice Saints – roughly from mid-May – do these conditions become more reliable in much of Central Europe. If you start earlier, you risk rain flushing products out of the joints, making the effort largely pointless.
The simple “tissue test” before you start
A quick practical check can help you decide: place a dry paper tissue over a joint. If it stays dry after a few minutes, the surface has dried sufficiently. If the tissue feels clammy or turns dark, it is better to wait.
A dry morning is ideal. That way, liquid treatments or hot water can soak in, and the sun increases the impact as the day goes on. Apply only directly into the joints rather than across the whole area, so the paving itself is not subjected to unnecessary stress.
"Mid-May plus three dry days: if you stick to that, you save yourself many rounds of weeding in summer."
Autumn: the best time to weaken roots for the long term
The second – and often more important – window for keeping joints clean over the long haul is autumn. Between early September and late October, many plants shift their stored reserves from the leaves back down into the roots to get through winter. If you remove the entire plant during this phase, you hit those energy reserves right at the source.
The result is that noticeably fewer shoots appear the following year, and the gaps between weeding sessions get longer. Many gardeners report that, after two consistent autumn efforts, the amount of upkeep drops significantly.
How to do a root-focused autumn push, step by step
- Choose the right tool: a joint knife, a dandelion weeder or a narrow asparagus fork work particularly well.
- Prepare the ground: the best time is the day after rain or after thorough watering. Softer soil releases roots more easily.
- Insert right by the stem: drive the blade vertically into the joint close to the plant.
- Use leverage: lift soil and root up in one piece, rather than tearing sideways.
- Finish off: remove any remaining fragments with a metal joint brush.
- Refill the joints: top up with clean, slightly damp sand and compact it by vibrating it in or sweeping it firmly into place.
When joints are filled properly, seeds have less space to take hold. Where voids remain, organic debris builds up and behaves like a miniature flowerbed – the perfect seedbed for the next crop of joint weeds.
Methods that do more harm than good
Online you will find countless "secret tips" for joints. Some look clever at first glance, but in the long run they can damage your patio, the ground beneath it and the wider environment.
Why salt has no place on a patio
Table salt can seem effective initially: the visible parts of the plant dry out quickly. But the crystals travel with water into the soil. There they draw moisture not only from weeds but from other soil life as well. The consequence is compaction in the sub-base, crumbling joints, and the paving can even start to shift.
"Salt doesn’t just dry out the weeds – over time it also dries out the entire soil beneath the patio."
There is also the environmental downside: salt can leach into nearby beds, lawns or even groundwater. The visible effect is short-lived, but the damage lasts far longer.
Ripping shoots off in spring encourages stronger growth
Another common habit is quickly tearing off new shoots in spring "for a first tidy look". If you only remove the stem without loosening the root, the plant often comes back more strongly. This is especially true for species with a robust rootstock.
A clearer approach works better:
- in late spring, treat only when a sufficiently dry spell is coming
- in autumn, go after the roots with proper tools
- afterwards, refill and compact the joints consistently
How often you really need to do it – and what can be combined
Many homeowners overestimate the effort involved. If you take two time windows seriously – mid to late May and the autumn period – you can often manage with surprisingly few sessions. Between those dates, a brief check is usually enough: pull individual newcomers by hand, shift moss with a brush, and sprinkle more sand where the joints look bare.
Choosing the right jointing material also helps. Specialist jointing sands or mineral jointing compounds allow fewer seedlings through than loose building sand. If you are laying a new patio or renovating an existing one anyway, this is a sensible place to start and can save a lot of work in the years that follow.
What surrounds the paving matters too. Overhanging borders, piles of leaves or cracks where soil collects all provide seeds and humus. If you remove fallen leaves carefully in autumn and keep edges tidy, you cut down the number of new plants establishing between the stones considerably.
Ultimately, it is not the harshness of the product that decides the outcome, but the combination of timing, weather, tools and joint maintenance. If you wait until after mid-May, tackle roots thoroughly in autumn and close up open joints straight away, your patio is far more likely to look neat for longer – without resorting to harsh chemicals.


Comments
No comments yet. Be the first to comment!
Leave a Comment