
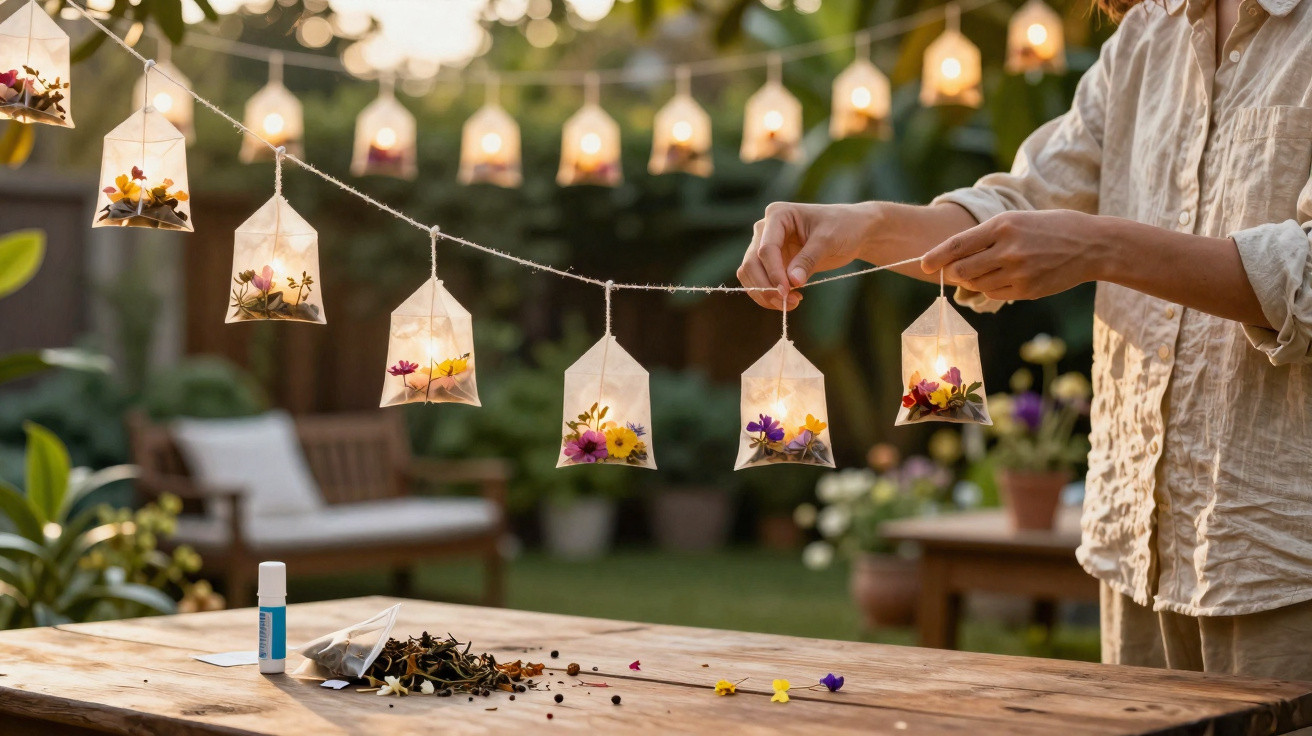
Sitting out on the patio in the evening often calls for atmospheric lighting-without spending a small fortune on solar fairy lights or designer lanterns. A DIY idea from the UK shows how used tea bags can be turned into romantic mini lanterns that wash the garden in a soft golden glow-almost for nothing.
How tea bags become glowing garden poetry
The concept is surprisingly straightforward: paper tea bags already have the right shape and size to work as tiny light panels. Once dried, they take on a slightly translucent, amber tint that softens and filters light beautifully. That’s exactly what DIY creator Sibia Torres Padilla-known on Instagram as @Sibster-leans into. Her video showing how she makes romantic garden lanterns from used tea bags has been shared widely and viewed millions of times.
In just a few steps, something destined for the bin becomes an atmospheric light source that can easily stand in for expensive garden lamps.
Plenty of people say they now keep a jar by the teapot to collect used tea bags, rinse them, and save them for later. What starts as an everyday cup of tea turns into an ongoing little craft project-ready for the next garden party.
Step by step: how to make a tea bag lantern
For one small lantern, you’ll need at least eight used paper tea bags. The more panels you make, the larger you can build the light. The key is taking your time with the prep; after that, it’s remarkably simple.
Materials list for a tea bag lantern
- used paper tea bags (empty and rinsed)
- white craft glue or wood glue, thinned with a little water
- pressed flowers, leaves or flat paper confetti
- thin wooden sticks, lolly sticks or straight twigs
- LED tea lights or a small battery-powered fairy light string
Preparing the tea bags
Start by carefully opening each tea bag along one side. Try not to tear the edge all the way off-otherwise the finished panel won’t hold its shape. Tip or spoon out the still-damp tea leaves, then give the empty bag a quick rinse under running water. Important: lay each tea bag completely flat and let it dry fully so there’s no risk of mould.
Once dry, you’ll notice small, uneven brown marks left behind-and those stains are exactly what gives the finished lantern its warm, vintage feel.
Sticking flower designs and building the frame
Next, brush a thin coat of the diluted glue over the tea bag. While it’s tacky, gently place on top:
- pressed garden blooms
- tiny fern fronds
- fine grasses, or
- confetti and punched paper shapes
Keep everything as flat as possible so the paper doesn’t split. Then add a second light coat of glue on top, creating a transparent protective layer. Leave the panels to dry again until they feel stable and slightly stiff.
After that, it’s time to frame them. Cut your wooden sticks or lolly sticks to match the edges of each tea bag and glue them around the outside like a picture frame. Four framed panels can then be joined into a small open column. For assembly, hot glue works particularly well because it sets quickly.
When each panel is treated like a miniature art print, the end result looks more like something from a craft market than a leftover-materials hack.
Place an LED tea light or a short battery fairy light string in the base of the finished column. Crucially, never use a real candle. Paper catches fire quickly, so only electronic lights are safe here.
Where tea bag lanterns look best in the garden
These paper lanterns work best in dry, sheltered spots. They don’t cope well with rain or strong gusts. Good places include:
- a covered patio table during a summer dinner
- windowsills under an overhang
- steps and stair landings on warm evenings
- hung beneath a pergola or balcony, with a bit of cover
Many hobby gardeners only put the lanterns outside for the evening and bring them back indoors afterwards. Used that way, they last much longer-even though they’re made from thin layers of paper.
In terms of design, you can take it in almost any direction. Alongside floral panels, you can cut small silhouettes from black paper-cats, birds or leaves, for instance-and light them from within. That creates shadow pictures reminiscent of traditional paper cut-outs.
Creative variations for families, children and décor fans
In lots of homes, making tea bag lanterns quickly turns into a shared afternoon activity. Children can arrange colourful confetti, stickers or tiny paper stars, while adults handle the scissors, glue and framing. LED lights are safe, and children can switch them on and off themselves.
It gets especially fun when everyone makes their own theme:
- parents go for subtle flowers and natural shades
- children choose bright dots, hearts or comic-style characters
- guests at a party can craft their own lantern as a keepsake
The result is a small collection of individual light pieces you can mix and match for different occasions-from a romantic evening for two to a garden gathering with friends.
What to keep in mind: durability, safety and sustainability
Because the lanterns are mostly paper and wood, they’re not designed for heavy rain or winter storms. If you want them to last, keep the following in mind:
- Store them dry: after use, keep them somewhere airy and moisture-free.
- No open flames: use LED lights only-never real tea lights.
- Clean tea bags thoroughly: remove all moisture and any tea leaf residue to prevent mould.
- Check stability: before each use, make sure frames and glued seams are still secure.
From an environmental point of view, tea bag lanterns score twice over: first, they extend the life of the tea bag well beyond a single brew. Second, they reduce the need to buy new décor items-often plastic-that typically last only one season. If you drink tea every day anyway, you’ll be gathering materials for your next garden project without even trying.
Background: why tea bags work so well as light filters
The effect isn’t just down to colour; it’s also about the paper’s structure. Tea bag paper is fine enough to let light through, yet dense enough to diffuse it softly. Instead of a harsh bright point, you get a gentle, even glow. The brown tea marks act like a built-in colour filter, creating the signature golden light many people associate with summer evenings and candlelight.
If you like experimenting, compare different types of tea. Black tea often leaves deeper, darker staining, while herbal teas tend to dry paler. That lets you mix shades-from a light beige through to a rich, honey-toned amber.
More ideas for upcycled garden lighting
Tea bag lanterns fit perfectly into a wider trend found in many homes: decorations that feel more personal, made from everyday items that would otherwise be thrown away. If you enjoy the technique, you can combine it with other upcycling ideas:
- turn jam or pasta-sauce jars into candle holders
- use old timber strips or pallets as mounts for tea bag lanterns
- add extra details such as dried orange slices, cinnamon sticks or sprigs of herbs
Step by step, you can build a lighting scheme that’s unmistakably your own-far removed from standard supermarket fairy lights. Each lantern ends up carrying a small story: where the flowers came from, who stuck them on, and which tea break produced the bag in the first place. That blend of memory, handiwork and soft light is what makes the idea so appealing.



Comments
No comments yet. Be the first to comment!
Leave a Comment