
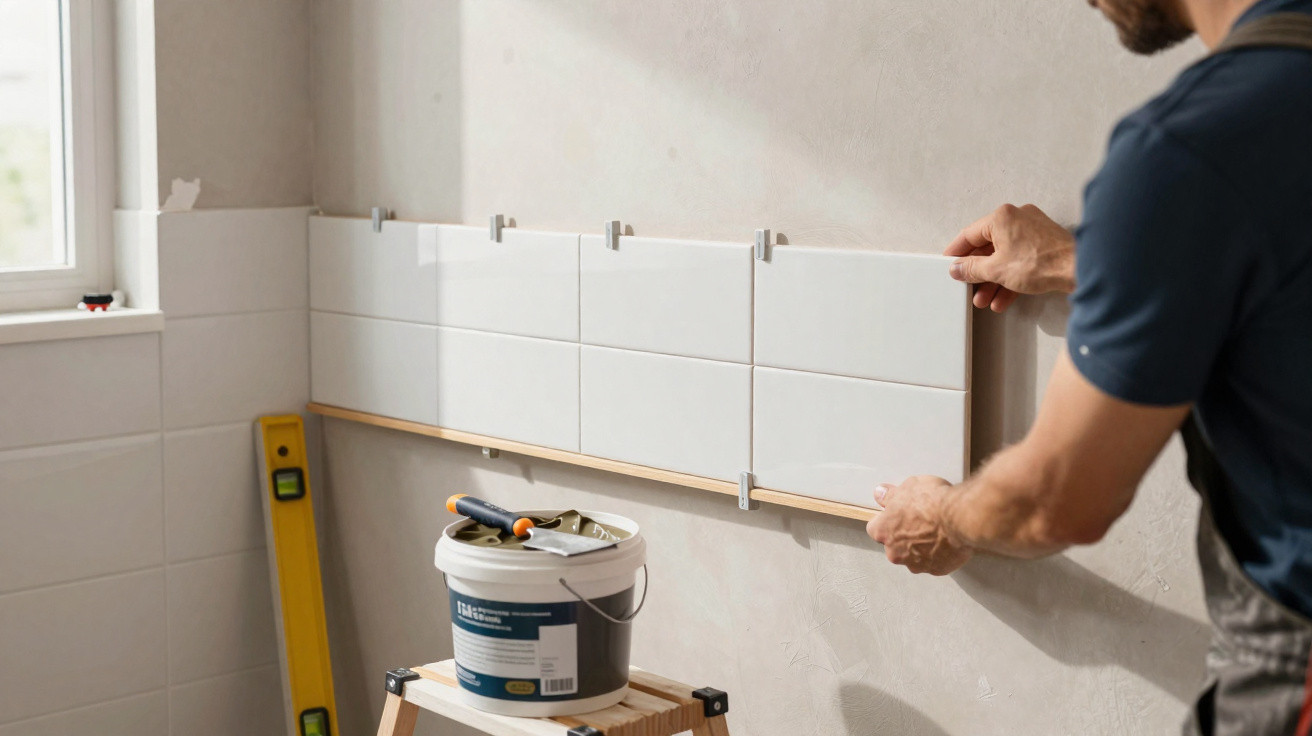
With one simple trick, every row stays exactly where it should.
If you want to freshen up your home in spring, you’ll often end up looking at bathroom wall tiles or a kitchen splashback. New ceramic can transform a room completely - at least on paper. In reality, freshly set tiles have a habit of creeping downwards, centimetre by centimetre. It’s frustrating, wastes time and leaves every grout joint out of line. With the right combination of suitable materials, a straightforward wooden batten and tidy technique, you can eliminate this issue surprisingly easily.
Why wall tiles slip in the first place
Tile adhesive that’s too runny - and layers that are too thick
The most common cause of slipping tiles is sitting right there in the bucket: adhesive mixed incorrectly. Many DIYers automatically add “just a bit more water” so it spreads more easily. It feels nicer to work with at first, but you pay for it immediately once it’s on the wall.
If the tile adhesive is too thin, it loses its initial grab - the tile slowly slides down until the adhesive starts to firm up again.
Just as bad is using an overly thick blob of adhesive behind the tile. It sounds reasonable that “more adhesive will hold better”, but in practice it does the opposite. Under the weight of the ceramic, the tile starts to slide on the heavy bed - almost like it’s sitting on a layer of soft soap.
- Don’t mix adhesive by guesswork; follow the manufacturer’s instructions.
- Aim for a thick, shape-holding mortar-like consistency - not something soup-like.
- Avoid adhesive “mountains”; create an even, combed bed with the notched trowel.
A practical check: the adhesive should cling to the notched trowel without immediately slumping off. If it drops in heavy blobs, it’s too wet.
The wrong adhesive - and missing spacers
For walls, not just any tile adhesive will do. Vertical surfaces need a higher-grab adhesive, typically labelled as C2 mortar. These products are designed to carry the weight of tiles on a wall without everything slowly shifting.
Two details on the bag or tub matter in particular:
- Class C2: improved adhesion strength, ideal for walls
- Open time of at least 20 minutes: enough time to align tiles without the adhesive skinning over too quickly
Self-clamping cross spacers or levelling systems also help. They don’t only keep the joint width consistent; they also brace neighbouring tiles slightly against one another. That noticeably limits downward creep and delivers a truly straight, flat finish.
The understated wood batten trick that changes everything
Why you should never start with the bottom row
A lot of people begin straight off the worktop, shower tray or floor. That creates two immediate problems: those surfaces are rarely perfectly level, and any small unevenness then carries through the entire wall. At the same time, the lowest tiles don’t have a secure support - the adhesive is still soft, extra weight builds above, and the tiles begin to drift.
The fix is simple: deliberately start with the second row and create an artificial “ledge”.
How to fit a timber batten as a perfectly level support
The method is basic, but highly effective: screw a sturdy timber batten to the wall, perfectly level. It becomes a temporary shelf for your second row of tiles.
- Use a spirit level to mark a horizontal line where the bottom edge of the future second row will sit.
- Fix a straight timber batten (for example, 4–5 cm wide and long enough for the run) to that line with screws.
- Double-check the batten is truly level - this is what determines how straight the finished tiling will be.
The timber batten works like a mini scaffold: it carries the tiles’ weight and stops even a single one from sliding down.
You can now set the tiles of the second row neatly onto this ledge. Everything above is built from that precisely aligned base.
Pro technique: double buttering for suction-cup-like grip
What “double buttering” actually means
Especially with larger tile formats, it’s rarely enough to only spread adhesive on the wall. Professionals therefore use what’s known as double buttering: adhesive on the wall and an additional coat on the back of the tile.
The process at a glance:
- Comb the wall with tile adhesive using a notched trowel (for example, a 6 mm notch) to an even bed.
- Apply a thin coat of adhesive to the back of the tile as well.
- Cross the ridge directions: horizontal on the wall and vertical on the tile - or the other way round.
- Press the tile in firmly and move it slightly back and forth until it “sucks on”.
By crossing the ridges, trapped air escapes efficiently. The adhesive spreads across the full surface and voids disappear. The tile ends up gripping the wall like a suction cup - and is far less likely to slip.
Patience before the final row: let it cure, then close the bottom
Why a 24-hour pause prevents a lot of hassle
Once you’ve tiled up to the intended height, the remaining bottom row is temptingly close. Even so, it pays to stop. While the adhesive behind the upper rows hasn’t fully cured, any extra load transfers forces downwards. If you remove the timber batten too early, whole sections can settle slightly again.
At least 24 hours of drying time gives the adhesive the chance to fully cure - after that, the tiled area is as stable as a wall.
Only after that pause should you carefully unscrew the timber batten. Now you can fit the bottom row precisely. This is usually where the awkward cuts happen: a slightly out-of-level floor, a shower tray with a fall, an old kitchen worktop with small waves. Measure tiles for this area individually and cut them to the millimetre.
Your plan for a neatly tiled wall area
Working in a structured way makes the bathroom or kitchen “tile battle” far less daunting. The key points in one place:
- Choose a suitable wall adhesive with high grab and sufficient open time.
- Fit a timber batten as an exact, level starting edge and verify it with a spirit level.
- Use double buttering, cross the ridges, and press tiles in firmly.
- Use spacers and levelling clips to maintain consistent grout joints.
- Allow at least one day of curing time before fitting the bottom row.
Useful extra information for DIY tilers
What the C classes on adhesive mean
Many adhesive bags show cryptic codes such as C1, C2, T or E. In broad terms:
- C1: standard adhesive with normal adhesion
- C2: improved adhesive with higher grab - recommended for wall areas and larger formats
- T: reduced slip, ideal for vertical surfaces
- E: extended open time, giving more time for positioning
For DIY use, a combination of C2, T and E is usually ideal: strong adhesion, less slipping and enough working time to proceed calmly.
Common mistakes you can avoid
Certain missteps crop up again and again on real jobs. If you know them, you save stress and materials:
- Spreading adhesive over too large an area at once - it starts to skin over before tiles are in place.
- Working without a laser or spirit level - small inaccuracies are immediately obvious in tiled joint lines.
- Not pressing tiles in properly - voids can make tiles more likely to crack or come loose.
- Grouting too soon - adhesive needs time before it reaches its final strength.
If you stick to the timber batten trick, choose the right adhesive and work patiently, you can achieve straight, stable and visually high-quality surfaces even as a hobby DIYer. A wobbly bathroom or kitchen building site can genuinely become a project you’ll look at with satisfaction for years to come.



Comments
No comments yet. Be the first to comment!
Leave a Comment